From Inspiration to Garment – Part 1 – Draping

Dear Readers,

I mentioned in my last post that my sew-jo has been low since the beginning of the year. I can think at least of 2 reasons. One, I cleaned out my closet (and the whole house while in my Marie Kondo phase) and I like owning less things, which tends to be incompatible with sewing. Second, I’m quite satisfied with my wardrobe. It sounds counterintuitive but after cleaning it , I see less gaps than before. Probably because I actually know what I own now. If you add the fact that I also shop RTW, it means that I’ll have to empty my wardrobe regularly and focus on less but better quality items.

When I cleaned out my closet, I had to part with a lot of handmade items. I never managed to do it before. The Konmari approach helped me realized that they were garments that performed their “Joy-Giving function” by being made but no longer did it by being worn. They had to go, and they did. However, it was not a very pleasant and to avoid it in the future, I want to focus on sewing what I will really enjoy wearing. Different tools are available for that (Capsule planners, Wardrobe architect, etc.) but they are all too formal/definitive for my taste. So I decided to be simple and shop my own Pinterest fashion board for ideas. I created a Sewing Queue board to gather my ideas and help me maintain focus when fabric shopping.

Picture courtesy of cupofjo.com
Picture courtesy of Cos

After finding a pretty Rag&Bone Chambray at Moods during my last trip to New York City, I decided to start by the first above picture. I believed that it has been pinned thousands of time. I went to find the original dress on the Cos website (see 2nd picture) and I was stunned at how this dress would never have caught my attention without Pinterest!

Since I am also to renew my sewing appetite, I decided to brush up on my draping skills. I attended several FIT courses when I lived in New York, and this is probably what I miss the most from the city! When draping by myself, I have a draping book open for guidance and reference. I actually don’t use it much but I like to have it next to me. I own several and my favorite is still one of the first books I bought: Draping – Art and Craftmanship for Fashion Design, by Annette Duburg. In my opinion, it has the clearest step-by-step instructions both for basic and advanced designs.chambray-draping-2No matter what book you use, the steps to draping are always the same and I will try to outline them. Before starting, this is what I did:

  1. Design analysis – in this case I noted kimono sleeves, front and back gathers for the bodice, font and back darts in the skirt, italian pockets and an invisible zipper at center back.
  2. Preparing the form – it includes adding style lines and in this case attaching my (self-made) arm which I taped to a cupboard to keep it way from the body (for the kimono sleeve).
  3. Prepping the muslin – cutting the different pieces, straightening the grain, pressing it and adding the main lines (center front, center back, bust, hip and others as necessary).

chambray-draping-1I then proceeded with the actual draping. There is a general order to this (neckline at center front, waist, bust at side seam, neckline at the shoulder, etc.) and it becomes natural once you have done it a few times because it’s quite logical.

I like to use style tape not only to mark the line on the form but also on the muslin. You may need to re-do it a few times and it will help keeping the toile relatively clean until you are ready to mark on it. Tape is also very useful to drape pleats or gathers.

chambray-draping-3 chambray-draping-4 chambray-draping-5When one think about draping, we tend to picture ourselves creating beautiful “drapés” and laboring over tiny gathers. The reality is that you spend a lot of time removing the muslin from the form, ironing it flat, “true-ing” your lines, cutting the excess of fabric, repining together and putting it back on the form. After each change, you repeat the process to assess whether it works or not. In that sense, draping is not necessarily much faster than flat pattern making. Of course, it depends on the design and your own preference.

chambray-draping-6 chambray-draping-7The waistband is a simple straight band, nothing particularly is particularly challenging about it. The only thing you have to get right is the positioning. In my case, I realized that it looked better a little higher than what I initially thought.chambray-draping-8 chambray-draping-9 chambray-draping-10Once I was happy with the bodice and the waistband, the next step was the skirt. You can see it below but I was unsatisfied with the hip curve. I ended up using the pattern of my open skirt project. I removed the pegging at the hem and I widened the side seams to match the waistband.

I have to add that the overall this is tighter than how you should drape. I lost some weight since my form was made to measure 4 years ago. My solution is to drape “skin tight” on the form and I get a comfortable garment on myself. I never had bad surprises so far…

chambray-draping-11chambray-draping-12My least favorite step is next: copying onto paper. I find it an intrinsically imprecise process.  Once done, I added my seam allowances, drafted all the details such as facings, closures and pockets. It’s the perfect time to mentally sew the garment to make sure the process is engineered in the pattern as much as possible. Doing this, you will be amazed at how much easier it is to sew a pattern you drafted compared to one you bought. Everything just comes naturally and I make less mistakes.

I don’t do many process posts so I hope this was useful to you. If you follow me on Instagram you may have seen the dress finished already! Let me know if you have any questions or if you have any draping tip you would like to share!

One final point, I’m currently spending the month in Ottawa, Canada (for work). If any of you are around, I would love to engage in some sewing gossiping/fabric shopping/coffee drinking!

Open Skirt Project

Dear Readers,


I will not apologize for the long absence, as it seems to be too common around sewing blogs (especially this one). There is a flu going around Haiti and I’ve been so sick that I could not participate in round 2 of the PRSewingBee. For me, that means very VERY sick… Enough on my disappointment, let’s have a look at V3 of the Open Skirt Project! For my next versions I will start using Size 1 for myself instead of size 2 as I like a closer fit. I’m very happy with the lowering of center front:

V3 Open Skirt Project

I did manage to send out the first newsletter of the Open Skirt Project and to update the pattern based on feedback and my own toile of version 3 (up). If you are interested in trying it out check out the size chart below:

Size Chart

Please take into account that although there will be instructions in the future, currently you have to be able to sew it on your own! For version 4, The PDF layout has been entirely redone and now you can use the layers in acrobat reader to print only the size(s) that you want!

If you are interested in trying out V4 of the pattern and receive the updates, please sign up for the newsletter (I promise I’m way too busy to send it often so there is no way you feel spammed).

I will be off for a week to Dominican Republic and I have not been doing much sewing lately but hopefully I will have things to show before the end of the year…

Open Skirt Project: an update + PR Sewing Bee

Dear readers,


First of all, I’m super happy to report that I have passed round #1 of the PR Sewing Bee contest, along with 55 amazing other seamstresses. The bad news that the second challenge is a man shirt refashion. And I hate refashions, they don’t suit my style. So it’s going to be a real real challenge this time: make a refashion looking polished… I also needto buy a thrifted shirt in a Pèpè (second hand stuff sold on the sidewalks) because The Old Man will not commit one of his!

To keep pretending that I follow-up on my announcements, I wanted to update you on the free skirt pattern that I have been talking about here. I created the first draft from the Muller&Sohn book and ran a first toile.

photo

I decided on a number of changes such as bringing some ease at the waist and shortening the back darts. I also offset the vent by 3/8″ to make it appear more closed.

For the second toile, I ran out of muslin and used the cheap gingham reserved for school uniforms in Haiti. By accident, I created the vent on the wrong side (and realized only after taking pictures).

Openskirt V2

I decided to bring the front darts a bit closer and to change some of the construction details of the vent. Also, the back is a bit big on me but I am a slightly smaller than my sample size.

I have been exchanging emails with Miranda, a super nice reader, and a New York patternmaker friend about this project. Their input have been invaluable. Thus, I would like to extend the discussion to whoever is interested. I have a lot of questions about what would people prefer (serged edges, favorite zipper type, number of pages for the PDF, etc.) If you feel like telling me what you believe is the best way to sew a vent, to layout a pdf or you just want to sew the pattern for yourself, let me know. The pattern is currently available in my sample size (that I’m arbitrary named size 2).
I already able to send V3 of the pattern in the sample size. Measurements are the following:

Sewing Tidbits – Skirt 1101 – Size 2
Cm Inches
Body Measurements
Waist 63 24 6/8
Hip 90 35 3/8
Hip Length 20.5 8 1/8
Finished Measurements
Waist 65.4 25 6/8
Hip 94 37
Skirt Length 55 21 5/8

Ultimately, i want to release 3 sizes, 1 up and 1 down from the sample size. If you want to participate in this discussion, please email me. I promise to send a weekly update on the project.

Wow, promises… Dangerous.

Colette Madeleine bloomers

Losing focus part II: one distraction after another

Dear readers,

The reality is that unlike some prolific bloggers (yes Lladybird, I’m looking at you), I can only sew on weekends. And even then not the whole weekend (hello power cuts…). So between monday and friday, I usually get excited about projects and the one the most recent excitement is usually the one that receives attention over the weekend.

Case in point : after coming from holidays I set to work on a modified Archer shirt, the following tuesday I got distracted by Lekala 4362. I ordered it and print it out. Unfortunately on Friday I got distracted by the idea of making cute cotton shorts as sleepwear… I reviewed all the PDF patterns available, almost bought Grainline Lakeside pattern, but my walllet got lucky and the shop was down for update. BTW, talking about distraction, have you seen the Alder shirtdress ? I can confidently say that this is pushing all other projects on the side and will get done in the very very near future…

Going back to sleepwear, I then remembered the cute cute version the free Colette Madeleine bloomers made by Peneloping. What she talks about in her post is exactly what happened, a pattern you looked at a million times, even printed and taped but suddenly YEARS LATER, you need to make it. And you need to make it NOW. I went to Pattern Review to check the comments because I remembered some useful insights about the fit. Reviewers mention the very low waist, which is what I wanted, and the lack of coverage, but considering that I was going to sew an XS, I figured it would be ok.

Colette Madeleine bloomers

As you can see, it is not bloomers at all. Call me weird but I could not imagine sleeping with ribbon tying my thighs… That required some pattern adjustment which I will probably detail in another post, as I plan to make another pair very soon (this weekend if I don’t get distracted by friday!). For this test version I used a Theory shirting cotton that I bought in Moods while still living in NYC.

IMG_3744

I used flat-felled seams everywhere and the whole process from taping to hemming took less than 2 hours. Bonus, The Old Man loves them (understatement). Extra bonus, they are comfortable and I’ve been wearing them every night (and day, humhum #sundayinyourpjs…).

Now, on sunday I’ve been good and I dedicated all my sewing time to Lekala 4362. After quite some work and alterations, this is where we are.

Lekala 4362, in progress

I will write a whole post about my modifications for this pattern so stay tuned!

And this is how you lose sewing focus…

I was in France. For 3 weeks. I bought fabric (of course). I came back less than a week ago and pre-washed all said fabrics (gold star for me). I started working on an apdapted Archer pattern for 1 or 2 shirts out of the new fabric.

Proof #1

Practising Plackets à la Off-the-Cuff mode...
Practising Plackets à la Off-the-Cuff mode

And Proof #2


Removing shoulder length...
Removing shoulder length…

And then i visited Lekala’s website and saw this :

Good by focus… HELLO RALPH LAUREN INSPIRED SHEATH DRESS!!!

I’m off to check my mailbox compulsively until the custom sized pattern arrives. It’s been 6 minutes and 48 seconds. WHY IS IT TAKING SOOOO LONG??!

More to come….

Franken-Pattern Making for faster/better sewing

If you are not familiar with the concept of Franken-Pattern Making (you can read about it here and here, unfortunately the original post from Sew-4-fun is no longer accessible), it consists of using sewing patterns for the design details only and mix them with a pattern you already know fits well (your personal blocks/TNT patterns if you want). It’s actually very close (if not the same) to what Carolyn does with her Pattern Sandwich method. It particularly suits my sewing style because 1/ my sewing time is limited and 2/ I don’t always have the courage to make a muslin. I also tend to spend a lot of time on the pattern. Taking classes at FIT (draping and patternmaking) really taught me patience when it comes to working on the pattern.  I remember reading one day on Fashion Incubator that you could break up time like this :

1 hour of pattern making, 1/2 hour of cutting, 1/4 hour of actual sewing.

It was enlightening! I drafted blocks in the past, trust me! I started early, by the time I was 15 I decided that pattern companies had it all wrong (haha, teenage overconfidence… I also thought that sleeves were stupid because they could not fit in armholes, STUPID SLEEVES!). As a result I got books and I started drafting, some of the result were TERRIBLE (this was my first book, not good…), some were good (with this book, this one, or this one). But at the end of the day, where are those drafts ? I DON’T EVEN KNOW!! I spent looooong  hours making them and turning them into usable patterns. I want to start from something that is already a pattern!

I said it before, I believe that Lekala patterns are particularly suited to play the role of starting blocks (haha, pun intended) or be used for a Focus on Fit approach, because :

  1. I’m very happy with the fit of the made to measure feature. It fits almost perfectly without alterations
  2. They have a wide range of styles, so I can start from something already close to what I want
  3. They are relatively cheap, they don’t add much to the overall cost of the project.
  4. I can print them with or without seam allowances. If I’m going to do a lot of changes I prefer to have none.

But let’s take a practical case so that I can explain myself better!

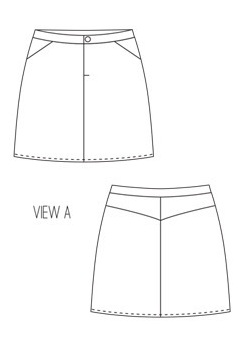
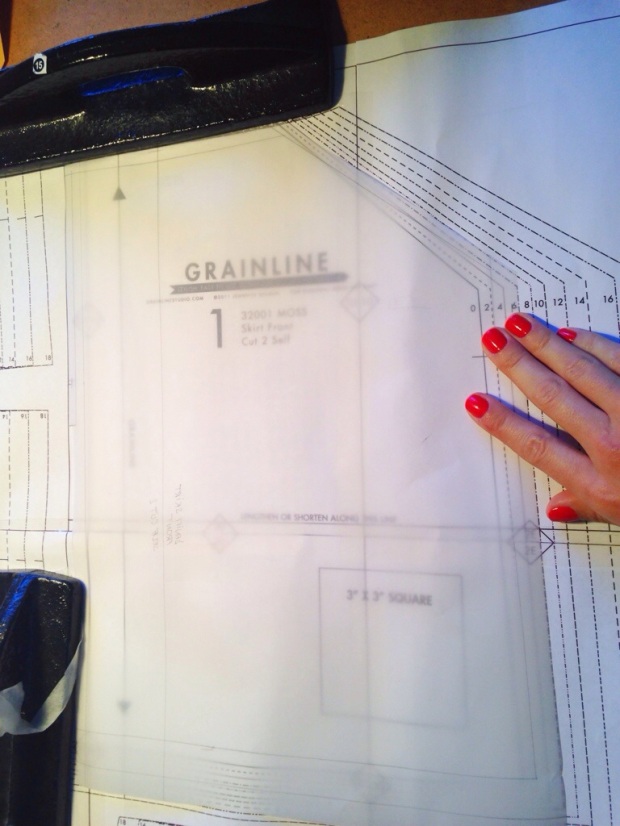
For Thanksgiving, amazing Jen of Grainline Studio organized a sale. I really admire the level of professionalism she brings to home-sewing patterns but I only made the Scout tee in the past. After seeing all the praise on her work (specially Archer), I decided to go ahead and purchase the Portside Travel Set, the Archer shirt, the Maritime shorts and the Moss mini skirt. Over the last few weeks I came to the conclusion that a short chambray skirt was THE basic that I was missing. To be with fair, I have this type of thoughts quite often, sometimes it’s legitimate (a white shirtdess, black slacks, a pencil skirt, etc.), sometimes it’s more questionable (a shiny midi skirt, leather shorts…). Anyway, my heart is currently set on a chambray mini skirt so I. NEED. ONE. NOW. The technical drawing of the Moss skirt is exactly what I want, but after looking at the size chart and Pattern Review, I know that there are very little chances that this pattern fits me right out of the enveloppe printer. My hips are size 4 and my waist is size 0…

So I  went on a search on the Lekala website, looking for something as close as possible. I set my heart on number 5430.

Lekala 5430
Grainline Studio - Moss Skirt
Grainline Studio – Moss Skirt

A comparison of the 2 drawings shows the design changes that I’m going to make to the Lekala pattern. But in addition, I like to embed construction in my pattern as much as possible. This means often changing the zipper parts, reducing seam allowances, etc. For this case, I settled on the following changes:

Design :

  1. eliminate the back dart for a yoke
  2. chop off the top of the waistband
  3. and add a back seam

Construction

  1. The Seam Allowances are dependent on the type of Seam Finish. I will serge and topstitche all visible seams on the inside. This means 1/2″. The seam between the skirt and the waistband will be encased so I will use 3/8″. But the top seam of the waistband will be only 1/4 to eliminate the need for grading it later. Hem will be double-folder : 3/4″and 1/2″.
  2. Pockets : i read how pleased people were with the pockets being attached to CF on the Moss skirt and how deep they are so I want to keep this feature BUT I also liked the 1 piece pocket bag from the Jedediah shorts by Thread Theory I just completed so I will incorporate that too!
  3. Fly zipper : I know everybody has it’s favorite technique, and people seems to feel very strongly about them. My best fly zipper of all times (and it was not only luck since I used it several times) was completed using this amazing book : Design Room Techniques by Laurel Hoffman. I know it’s pricey but it’s worth every penny. I promise!! Otherwise, I think this one by Notes from a Mad Housewife looks great too!

Now for the visual people out there, I took pictures of the process. First this is what a Lekala sheet looks like for a pattern without seam allowances :

20131212-091117.jpg

I started by drafting the yoke and closing the dart (TIP: close the dart first, which is not what I did on the picture below so I had to redraw my curve completely…)

20131212-091139.jpg

Then I added seam allowances on the back pieces and compared with the Moss pattern :

20131212-091151.jpg

My yoke is a lot curvier than the Moss one, which makes sense since I have a bigger hips/waist differential (please not that I should have aligned the straight grains before taking this picture)20131212-091210.jpg

The Waistband pieces have been modified to be thinner and to have the extension needed for the fly zipper. There for there are 2 pieces fro the front and one is longer than the other.

20131212-091336.jpg

For the front, I added seam allowances and drafted the zipper pieces from Laurel Hoffman’s book, using a 5″ zipper instead of 7″.

20131212-091201.jpg

Interstingly enough, it seams that although the back are almost exactly the same width, my Lekala is considerably larger in the front.

20131212-091227.jpg

20131212-091236.jpg

The key of this zipper method is that right side and left side are NOT identical pattern pieces. I will remove 1/4″ on the one of the sides but only after cutting since I’m cutting double layer this time.

20131212-091256.jpg

A better view of the zipper set :

20131212-091307.jpg

Now the pockets : I did not change the pocket shape from the Lekala pattern as I find it close enough.

20131212-091243.jpg

But I redrafted the pocket bag, so that it’s deeper, it reachs the middle (Grainline Instructions) but it’s 1 full piece of contrasting fabric (I like to use muslin) to be folded and with “facings”  of self fabric (Thread Theory Style). The result is this :

20131212-091250.jpg

An essential step after all this work is to WALK ALL THE SEAMS and check/correct the notches. This is what will make your sewing really fast because everything will match seamlessly (haha, again).

For the fabric I had a very small leftover of chambray from an old old UFO (which I think I finally tossed). The limited amount of fabric will not allow extra for mistakes, all the more reasons to be extra careful with the pattern.

20131212-091313.jpg

As you can see on the picture below, I like to cut my waistbands with the grain parallel to the longer side. I think it makes them more stable. You can see all the fabric I have… It’s not much!!20131212-091322.jpg

I hope this process post was helpful, as I said in my blog anniversary post, I’m trying to bring more substantial content and not only final results pictures. So I would love to hear your thoughts about franken-patterns, fly zippers, etc. !!